As an Android developer at Wirex, my role is to create fin-tech products that allow users to manage their traditional currencies as well as with cryptocurrencies.
When your app works with customer’s money you have to make sure that the internal flow and product works as expected at all times. That’s why we’ve spent a lot of time performing different tests on our codebase— End-to-End (E2E), Unit, User Interface (UI), etc.
The most valuable test for us was always E2E, because they can test specific flows from start to finish. For example — a single screen test, we mock server responses and validate that the screen UI is in a proper state. Alternatively, flow test — emulate user interactions (needed fields input), and check that the UI looks like it should at every step, and finish by collecting the completed information to check that the API calls are correct.
From the very beginning, all our E2E tests worked using Robolectric. However, we later decided to extend them to run on an emulator as well, which could produce more complex reports with screenshots or other additional information about how it runs on a device. After the tests were done, we realised that there were some tests that passed with Robolecrtic, but failed with some bugs on the emulator.
In this post I want to share some information about the problems we were faced with and the solutions we found.
Problem 1: Common code
In our case — almost all codebase from Robolectric tests could be applied to the instrumentation tests — the same calls, check, etc. That’s why we started creating solutions that would reuse common code in both test types.
In the following simple example, I want to show the steps taken to separate and reuse common code — a test for checking view visibility state changes.
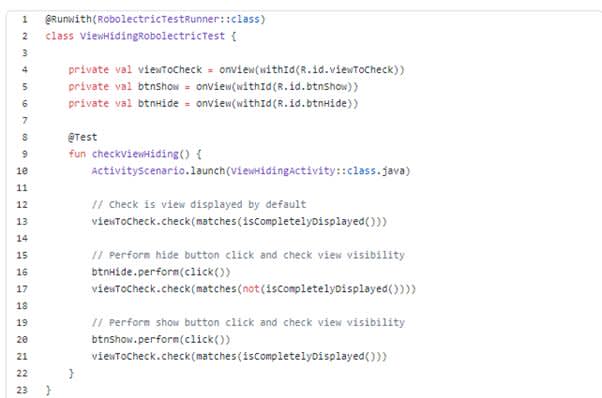
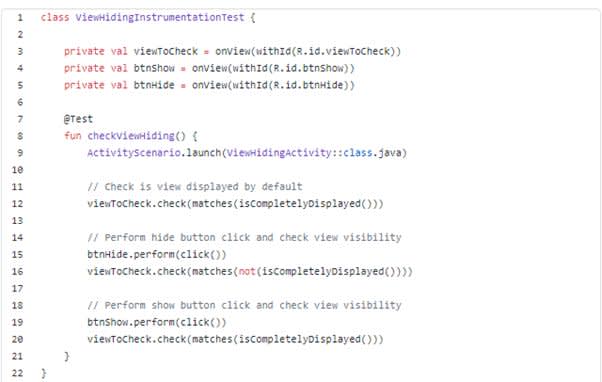
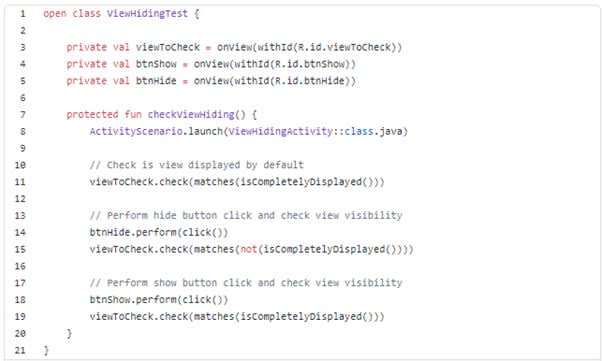
There are two tests for checking this — using Robolectric and Android Instrumentation.
Robolectric:
Instrumentation:
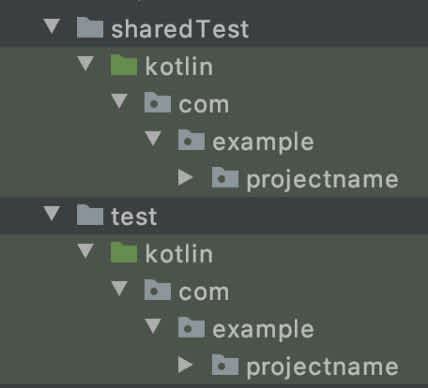
As you can see — all logic is the same for every test type. So, you can create some “main” tests for this case, and reuse it for Roboelectric and instrumentation implementations. You need to create a directory at app/src, where you will place all common parts. In this example, I named it as sharedTest.
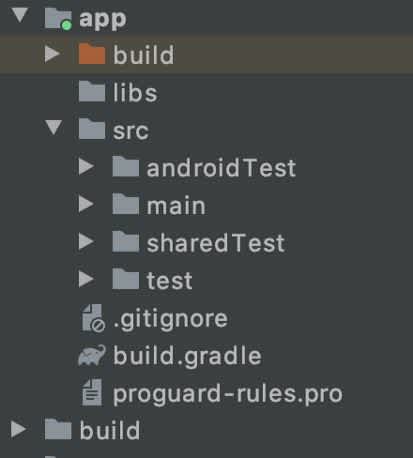
It’s a good idea to make a package structure inside sharedTest, as it is in other test folders:
Next — you need to provide this folder as a source set for both test types — Instrumentation and Robolectric.

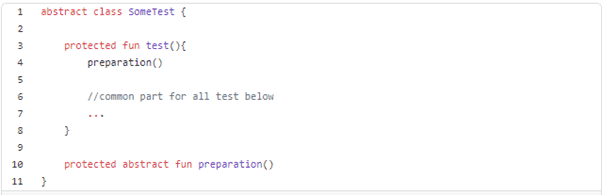
After that you can create a common test class, where common logic will be placed:
Note: There is no need to use @RunWith or @Test annotations in a common test class.
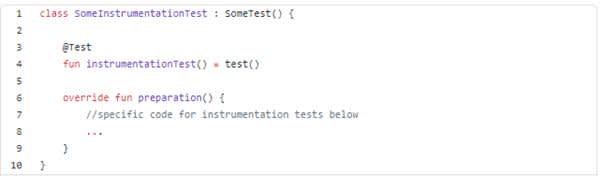
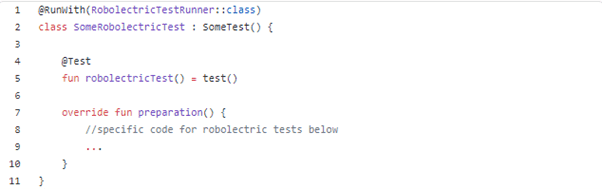
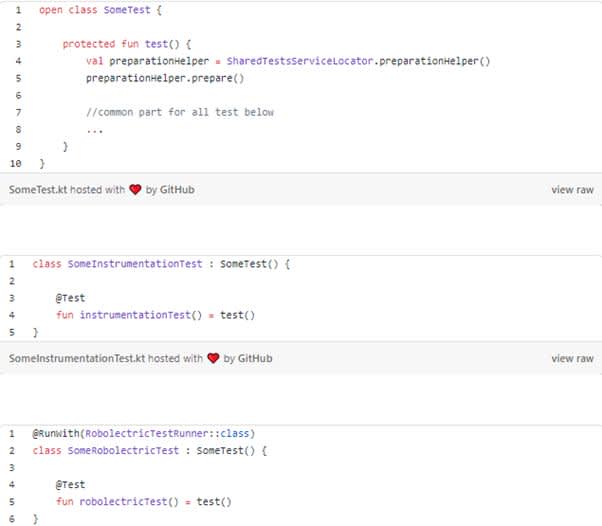
And now you can simplify 2 other tests
Robolectric:

Instrumentation:

Well, this is already a good result — common code is reused, and you have a clear tests structure. However, if you’re creating a test with more complex logic than our example — you will be faced with actions and features that need different implementations for Instrumentation and Robolectric tests.
Problem 2: Test type specific code
Let’s get this test a little bit closer to the real cases. Imagine that we need to do some preparation, and as the first step of our test, this preparation should use specific logic for instrumentation Robolectric tests (for example InstrumentationRegistry for Instrumentation and Shadow for Robolectric). The main problem here is that if you want to make a clear module and package structure, a common test class should not use specific classes for one of the test type. In Wirex we achieved this by separating build.gradles files for Robolectric and Instrumentation tests, and we can’t even import, for example, Shadow to a common test class.
According to build.gradle separation, you need to define the difference in appropriate test classes. This goal can be achieved using different approaches, and we will take a look at each of them, from easy (and least functional and extendable) to complex.
Factory Method pattern
You can solve this problem using the factory method pattern.
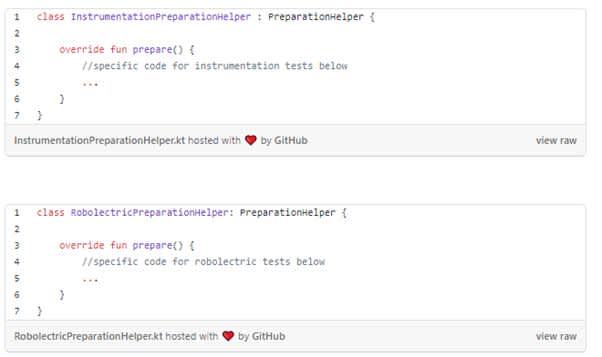
After that you need to define specific logic in both implementations.
Instrumentation:
Robolectric:
This solution makes it possible to resolve differences in a simple way, but it leads to an unclear structure, a lot of boilerplate code (if differences are resolved in more than one test) and is hard to support or update.
Service locator pattern
One other way you can deal with this is to move a specific logic to classes and provide it in your common test class using a simple service locator pattern implementation.
First, you need to create an interface for the preparation helper class. This interface will be used in the common test class and that’s why it should be placed in the sharedTest folder:

After that, create implementations for different test types. InstrumentationPreparationHelper should be placed in the androidTest directory and RobolectricPreparationHelper in the test directory.
The next step is to create a service locator class that will provide needed PreparationHelper implementation. Insofar as classes in sharedTest have no idea about other test folders and their classes, there is no way to provide implementations without using reflection on this. For example, you can find a similar approach in the UiControllerModule class from the Espresso package.
This class also should be placed within the sharedTest folder to make it possible to use the locator in common test classes.
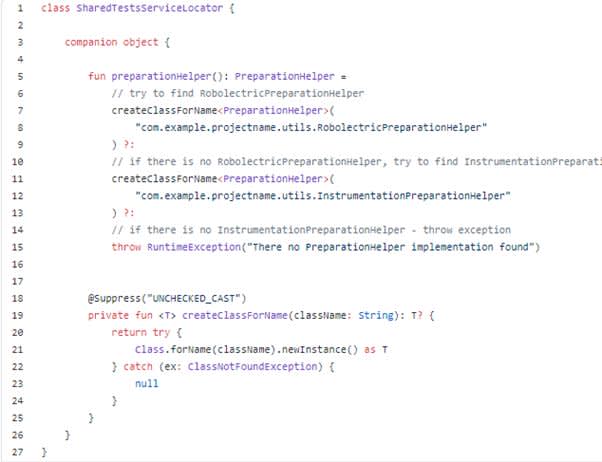
Note: you need to try to find the Robolectric class first, because classes from androidTest can be created for Robolectric tests too.
Then you need to update the common test class and its implementations to use SharedTestsServiceLocator:
In this implementation, different preparation code will be executed depending on how the test is running. Using this method of solving the problem of difference is pretty simple and fast to code, but it is also a little bit dirty. First of all, if the reference for your helper classes will be changed, there is no way to change it inside the service locator automatically. Also, because your helper’s class is detected by Integrated Development Environments (IDE) as unused, that may also lead to some problems and unexpected situations.
Dependency Injection (DI) & Service Locator
To minimize your Service locator usage and to make the codebase more flexible, clear and readable, you can update your logic using the DI pattern with Dagger2.
First of all, you need to define TestApplicationComponent— the interface for future Dagger @Component. In real cases, some components may require App or Context, so it’s a good idea to also create TestApplication class, where you will create your components and pass to them the required dependencies. Also you need some classes to provide different implementations of TestApplicationComponent. In the example below, this class is TestAppComponentProvider.
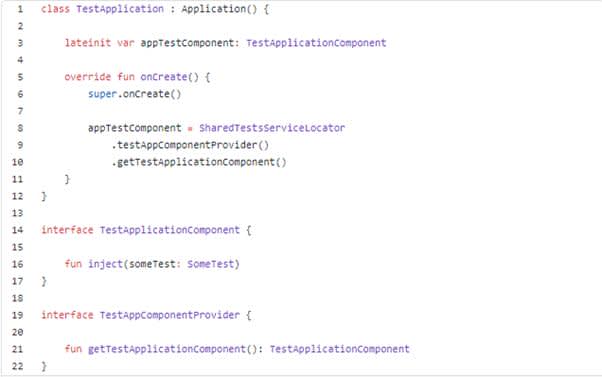
Note:
- Classes from this file will be used in the common test class and should be placed in the sharedTest directory.
- TestApplicationComponent is not a Dagger @Component, it’s just a common interface for real components, that make it possible to call the inject() method of component implementation from common test class (where there is no information about component implementations).
- In the listing above you can see the usage of SharedTestsServiceLocator (with reflection) in TestApplication to provide TestAppComponentProvider — it’s the only place that you must use it.
- To use TestApplication in tests you should create a custom TestRunner, where you will define which Application class to use for both test variants.
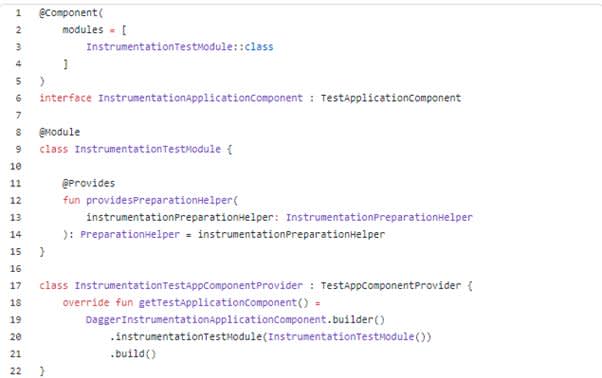
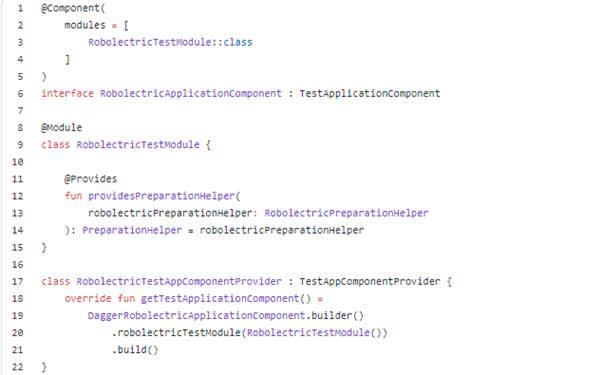
The next step is that you need to define the TestApplicationComponent and TestAppComponentProvider implementations for the instrumentation and Robolectric tests. You also need to add @Module to provide the needed implementation of PreparationHelper.
Instrumentation:
Robolectric:
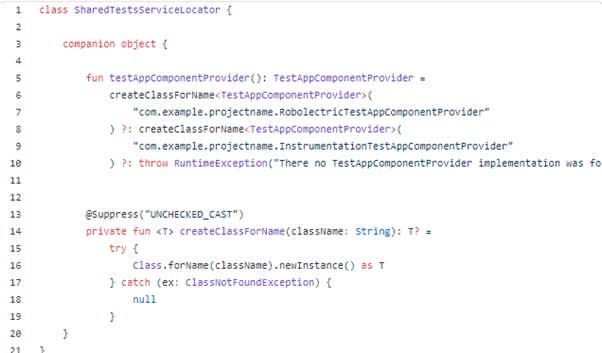
Updating the service locator to provide the needed TestAppComponentProvider:
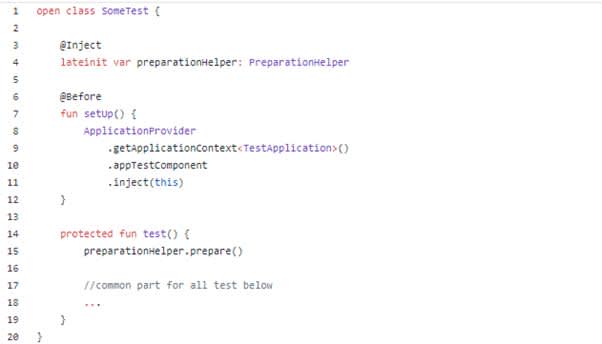
Finally, you can update the common test class. The code for instrumentation and Robolectric implementations doesn’t change.
After this update you decrease the size of SharedTestsServiceLocator it only should provide the needed TestAppComponentProvider. If you need multiple different classes in the future, you just will use the existing DI system, and not use reflection. This approach is more readable, clear and extendable.
Conclusion
In this article we created a system for running the instrumentation and Robolectric tests and improved this system step-by-step to achieve maximum readability and extensibility. It’s not the easiest way, since the implementation described requires one to two days work, but if you spend this time at the beginning, you will be able extend your test system in the future in an easy way.
Written by Oleksandr Hrybuk, Android Developer
Credits to the Wirex Android Team, Alexander Shaubert and Andrey Derkach for helping me write this article