
The introduction of SwiftUI during WWDC 2019 (Apple Worldwide Developers Conference) made us rethink how we write scenes. Since SwiftUI is a declarative, state-driven framework, and is the future of iOS development — we decided to adopt a state-driven approach with our UIKit-based app, to stay one step ahead of the future of programming.
Originally our app was written using standard MVVM (Model-View-ViewModel). ViewController had a version of ViewModel, and there were many bindings between them, but this approach had some drawbacks.
The idea of the new approach is that ViewController is responsible solely for the user interface (UI), and it declares and accepts a State that describes what should be rendered on the UI. A State consists of primitive data and is easy to mock, so we can mock the State to preview the UI. Then there is ViewModel responsible for generating a State, which we can test by giving it mock data and checking the State it generated from that data.
The new approach introduced these improvements to standard MVVM:
- In MVVM, ViewController has an instance of ViewModel. If we want to render ViewController on its own, we have to create a mock ViewModel, with all the bindings, which can be quite hard. However, now we can render our ViewController by creating only a State — a primitive structure that represents UI. Not only that, but it becomes easy to reuse ViewController or mock the UI for SwiftUI previews or Snapshots
- In MVVM, ViewModel has many bindings, and the logic of combining these bindings into the UI is handled inside the ViewController. Now, ViewModel returns a State — an already “combined” UI representation, meaning it becomes easier and more effective to test a State in Unit Tests, than data from many bindings
You can look at this closer by reviewing parts of this sample project.
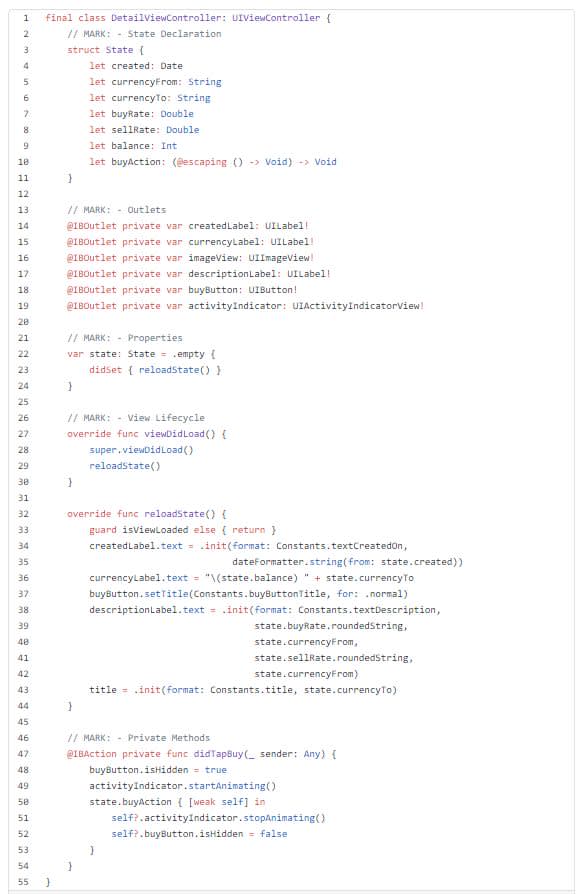
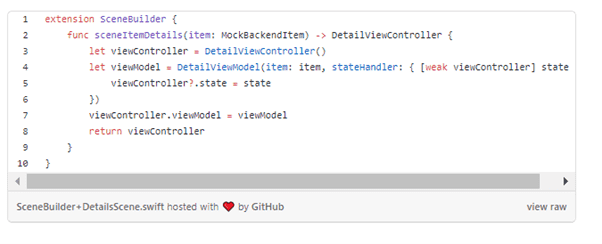
Let’s start with UIViewCntroller
Every ViewController has a State and can be rendered and updated by passing a State to it.
The State must consist of primitive data, such as String, Decimal, Date, Enum etc. This ensures that it’s easy to render just the ViewController without touching your Business Logic, so that you can focus only on the UI part, but more on those rules later.
ViewController holds a reference to its State and updates everytime the State changes.
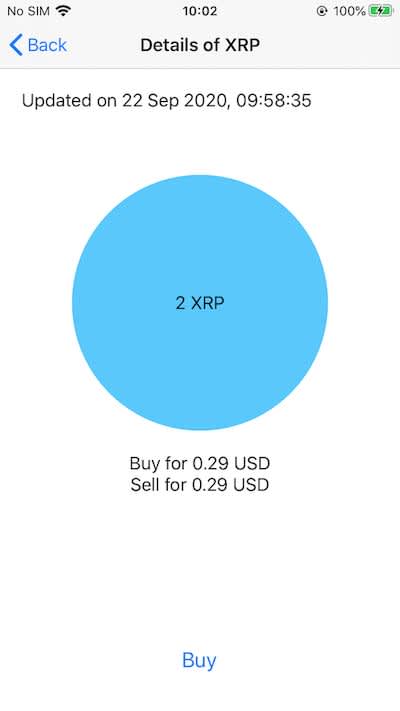
To render our DetailViewController, it is enough to run this code:
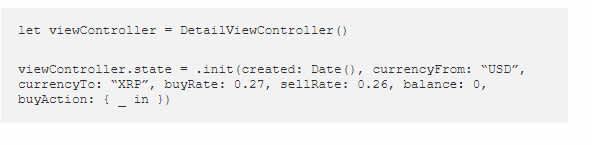
Since it’s easy to render, it becomes possible to use SwiftUI Preview during development, or snapshots for tests. We can also reuse ViewControllers if the UI is the same, but the logic is too different on some screens.
Now we’ve got the UI, let’s look at Business Logic — ViewModel
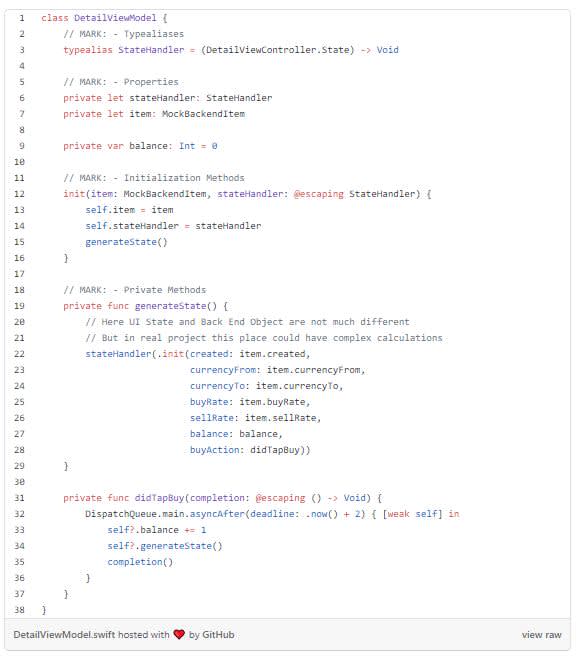
The job of ViewModel is to generate a State from different data streams in the app. These may be responses from NetworkRequest, user interaction, or any kind of frameworks. For a complex screen, ViewModel would receive multiple values of data and combine them into a State for the UI.
When a new State is generated, it is passed to the StateHandler. A StateHandler is a closure, received on ViewModel.init, where the creator of ViewModel expects to get State updates. This approach also allows us to use ViewModel in Unit Tests. By passing mock data to our ViewModel and checking the State generated based on that data, we can write Tests.
Now, to glue ViewController and ViewModel together this code would be used in the following way:
Because ViewModel and ViewController are separate instances and can operate on their own, it also becomes much easier to switch to SwiftUI when needed, because ViewModel will not require any changes.
Examples of States in Wirex iOS App
Creating a State is the most important part of this approach. Let’s look at more complex screens and their States to get an idea of how it could be done:
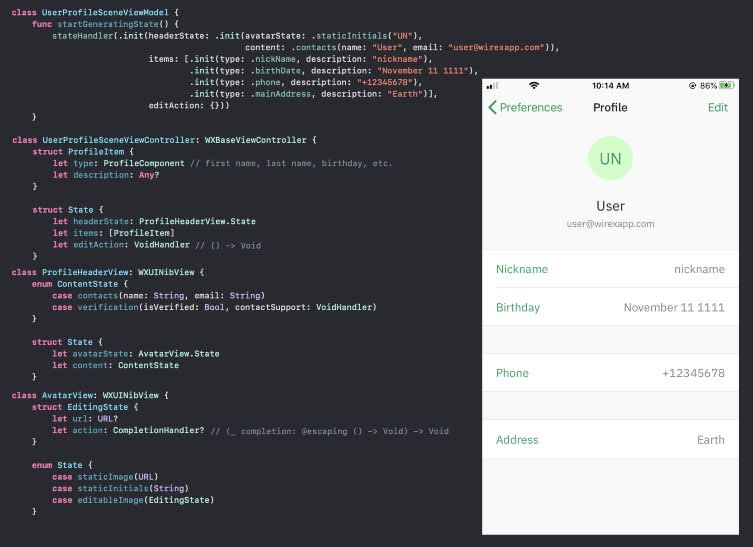
This is a User Profile State. Method startGeneratingState() generates the State with which we rendered the screenshot; you can see that what we pass in this function to the State is displayed on the screenshot. Below, you can see a State for ViewController and two Views used on this screen. The State is not limited only to ViewController, and it can and should be used for View too. Keep in mind the fact that there could be user actions, and if they exist, they should be passed as closures.
The next one is the Add Account screen:
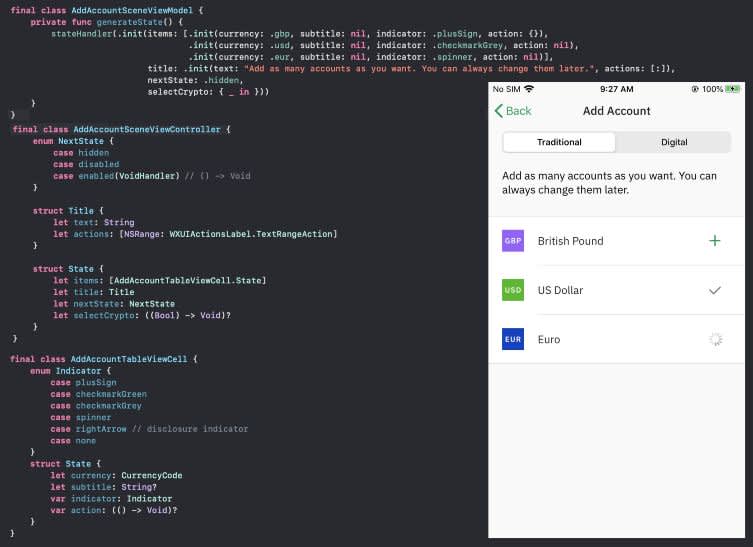
In this example, it has the selectCrypto action empty, but in the app this action allows us to generate a new State with only cryptocurrencies or fiat currencies, as soon as the user triggers the action. Triggering the item’s action can cause a network request to be sent, after which we’ll generate a State with a spinner, and when the request is successfully completed, there will be a grey checkmark.
Rules for declaring a State object
Creating a good State object is very important, based on the State, the ViewModel and ViewModelTests will be written, not only ViewController. If the State is more complicated than it needs to be, then all three files will be affected — ViewController, ViewModel, and ViewModelTests.
Below are some examples of do’s and don’ts that we have at Wirex at the time of writing:

Adopting a State model and these rules allowed us to clearly separate logic from the UI, giving us the ability to test business logic, preview the UI, and prepare for an easy SwiftUI switch. You can find examples of all of that in the sample project.
Written by Iwan Protchenko, iOS Developer
Credits to Wirex iOS Team: Oleksandr Borysenko, Daniil Bystrov, Iwan Protchenko